Data
The following figure shows the appearance of the data panel.

You may not have any subject information yet as shown above. Don’t worry. Let’s Import some. Before importing any subjects’ data into our workspace, make sure you prepared your data segments for each subject as instructed here and setup the corresponding Brainstorm protocol directory correctly.
Import


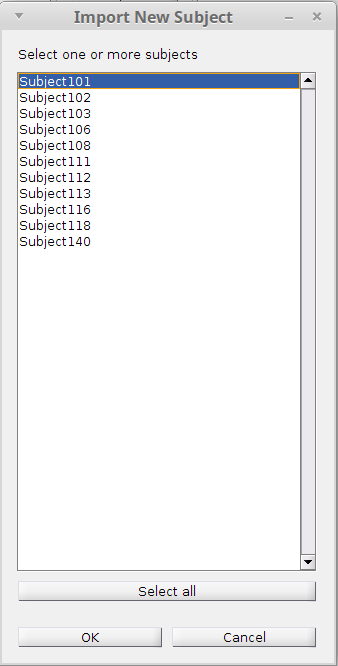
Click the first button Import on the right to begin. If you fullfilled the prerequisite correctly, a list of subjects that have not been fully or partially imported will show up (i.e. those subjects in the Brainstorm protocol but not in the EZF workspace). You may
Select a single subject:
You need to click one of the subjects then click
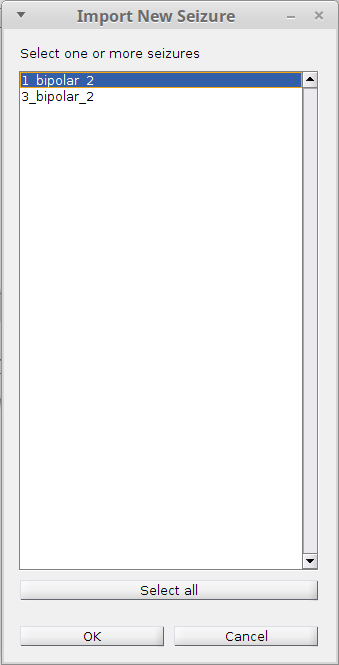
OK.You will then be prompted to select one or a few or all the seizures from that subject. Select seizures you’d like to import and click
OKagain.Select multiple or all of the subjects
You need to hold the
ShiftorCtrlbutton and left click the subjects you want to import, then clickOk.In this case, all valid seizures from all the selected subjects will be imported (merged if there are already some data in the workspace) into the current workspace.
Delete
Click the second button Delete on the right then a list of current subjects in the workspace will show up. Similar to importing, you may either delete some seizures from a single subject or delete multiple subjects at the same time. See instruction for importing above for details.
Now let’s take a detailed look of the meaning of columns.
Data List and Processing Status
- Column 1 and 3: Checkboxes you can click on to select or un-select the subjects or the seizures. See “Data Selection” section below.
- Column 2: List of subjects in the workspace.
- Column 4: List of seizures for each subject. The number inside the parentheses indicates the number of channels.
- Column 5 - 13: Status for each of the processing steps. Checked box means that step has been finished and the checkboxes in these columns are not clickable.
- TF - Preprocess: time-frequency analysis.
- IC - Preprocess: (complex) independent component analysis.
- AR - Preprocess: artifact removal.
- N - Preprocess: normalization.
- M - Labeling: mark for bad channels and the end of fast activity.
- L - Labeling: label of resection
- FA - Training: feature extraction of fast activity
- SP - Training: feature extraction of suppression
- PS - Training: feature extraction of pre-ictal spikes
It’s time to make a selection. You have a lot of choices of how you can select data depending on what’s your next task.
Data Selection
Click the checkboxes in front of subjects or seizures
The simplest way to make a selection is to tick or un-tick the checkboxes either in front of the subjects (column 1) or the seizures (column 3). Toggling the a subject checkbox will effectively selecting or un-selecting all seizures for that subject.
Select All or Select None
As their name suggested, you may select all data or clear all selections by click the button
Select AllorSelect None.Select the Next or the Previous
The
Nextbutton and thePreviousbutton are only available when you have only one seizure selected currently. Then pressing those buttons will move your selection to the next or the previous one correspondingly.Multiple Selection
Click
Multi-Selectbutton will bring up a new window that allows you to choose any seizure from any subject freely.Single Selection
The last option is this
Singlecheckbox. When it is ticked, selecting any subject or seizure using the checkbox method will automatically un-select all other subjects or seizures.Quick Selection Using Keyboard Shortcut
Finally, we provide several keyboard shortcuts (case sensitive) for quick selection of data based on your current processing status. Feel free to play with them and you will find them very useful especially when you process a large number of subjects.
t- select the first seizure that are ready to compute TFi- select the first seizure that are ready to compute ICa- select the first seizure that are ready to compute ARn- select the first seizure that are ready to compute Nf- select the first seizure that are ready to compute FAs- select the first seizure that are ready to compute SPp- select the first seizure that are ready to compute PST- select all seizures that are ready to compute TFI- select all seizures that are ready to compute ICA- select all seizures that are ready to compute ARN- select all seizures that are ready to compute NF- select all seizures that are ready to compute FAS- select all seizures that are ready to compute SPP- select all seizures that are ready to compute PS
Beyond the basic data manipulation functions, we also provide two workspace management functions to you for your convenience.
Split
You may split the current workspace into two separate workspaces in order to distinguish different group of subjects. To do so, you need to select the subjects you want to separate out, then click the Split button and choose the destination directory you want to store those selected subjects. A few helpful notes here:
- Make sure to select subjects you want to remove from the current workspace and save to another place.
- A empty destination directory is highly recommended.
- You will stay in the current workspace after splitting. You may switch to the new one immediately if you want to work with the subjects you just separated out. See “How to switch workspace?”
Merge
Similar to splitting but with an opposite purpose, you may combine data from two workspaces together. A long paragraph of instruction wouldn’t necessarily be as clear as a simple example. Say if you want to merge workspace A to B.
- Switch to workspace B first if you are not in B yet.
- Click the
Mergebutton. - Select workspace A, click Ok and you are done.