Labeling
Mark Bad Contacts and the End of Fast Activity
In this section, you need to mark three things to proceed. Only one button you can click and the instructions are already shown on this panel directly.

Click the Visualize & Mark button to open the TF plot. Then
Mark bad channels if there is any.
Bad channels are those where signals were heavily corrupted by noise or some non-physiological factors. e.g. channels had bad sensors.
Right-clickbad channels using your mouse to mark or unmark, just like what you did when marking artifact component.Press
skey to save the mark.
Correct and mark the onset time if it’s off.
Sometimes due to the inaccurate segmentations of the time series in Brainstorm, the onset time is not necessarily well aligned to zero. You need correct it at this point if it’s off zero.
Left-clickany contact that has a clear onset to have a close view.On the single TF plot,
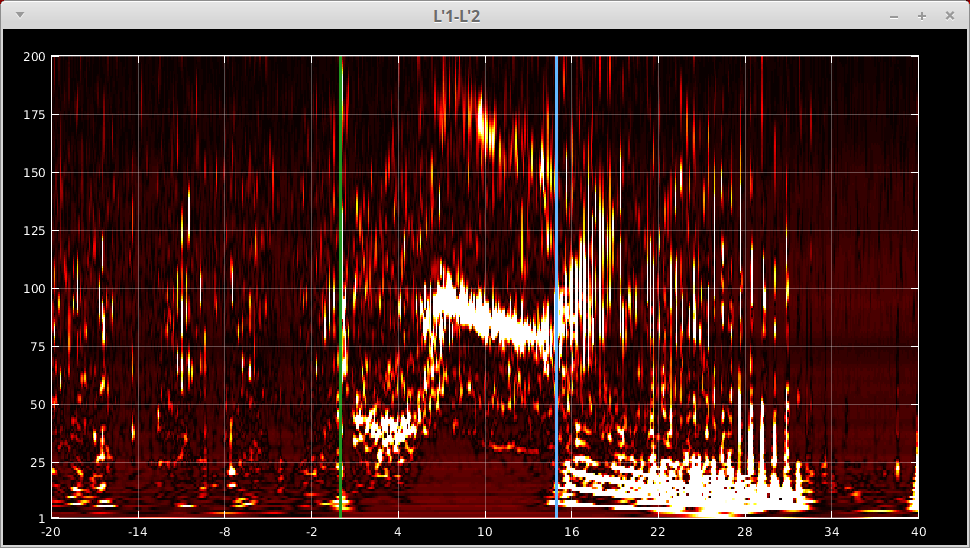
left-clickto set the onset time point. The current onset time is marked by a green line.You don’t have to press any key to save the result. The new onset time will be effective immediately after your clicking.
Mark the end point of the fast activities.
Left-clickany contact that has a typical and clear fast activity to have a close view.On the single TF plot, locate the end point of the fast activities. A blue vertical line will show the previous mark if it’s marked before.
Right-clickto set a new ending point.Press
skey to save the mark.If fast activity lasts longer than the data you collected, mark the last point (right edge of the image) as the ending and save it by pressing
s.
You may press
ckey to clear the mark if needed.
Several notes here:
For step 1 and 3, don’t forget to save your mark by pressing
s. Especially when there is no bad contact needs to be marked in step 1, you still need to presssto save the information.For step 1 and 3, correcting an existed old marks will trigger a confirmation prompt when pressing
s, clickYesto overwrite.For step 2 and 3, you may find often it’s efficient to mark the zero time point and fast activity ending point in the same TF plot. You may also want to verify your choices by looking at other individual contacts. Feel free to check and/or re-mark as needed since your timing marks will be carried over among different contacts.
An example of the marking for the zero time point and the ending of the fast activities is shown below.

A tick in the “M” column will show up in the Data panel for each of the seizures of your selection, indicating the completion of this step.
Label Resection
In order to train and/or test a classifier, we need some ground truth for a set of subjects, which are the binary labels indicating which contact(s) is(are) the EZ contact(s). However, that is exactly we want to figure out! This is a chicken-and-egg problem. Although we are lack of EZ label, fortunately we can still perform training or testing (only seizure free subjects can be used for training, see Training) if we have access to the resection label that indicates which contact(s) has(have) been resected during the surgery. Note that this label of resection is not required for prediction.
In this section, you are asked to mark the contacts that are inside the resected area. You may select multiple or all seizures for a subject to label them simultaneously, as long as the seizures you selected share the same set of contacts. Technically, you may even mark contacts across multiple subjects. However, this rarely happens as different subjects often do not have the same set of contacts.
The labeling panel looks as follows.

A list of contacts is shown in the middle and you can Ctrl or Shift + left-click to select one or multiple contacts. Selected contacts will be highlighted in blue. Then click the Save button to save your selection. Again, a confirmation dialog will appear if you want overwrite the existing labels. Four more functionalities are provided for your convenience. You may find them useful but they are not necessary for later process.
ClearClear the current marks. Note that clearing the current marks do not affect your label until you save them by pressing the
Savebutton.Export CSVThis will export your current label(s) (the last version you saved, not your current marks) to a csv file. Note that you may select multiple or even all subjects then export labels for all of them at once, although they do not share the same set of contacts, hence
SaveandClearbutton is not available.Then you may open the csv file to visualize the summary of labels across subjects with some other software, e.g. MS Excel.
Export ZipSimilar to the previous function, but instead of exporting to a csv file, this will export your current label(s) to a zip file. This is particularly useful when you want to share your label(s) to other people.
Import CSVOpposite to
Export Zip, this will import label(s) from the zip file saved byExport Zip. This is particularly useful when you want to import label(s) that are marked and shared by other people.
A tick in the “L” column will show up in the Data panel for each of the seizures of your selection, indicating the completion of this step.